Very soon I will be fitting the intake manifold and plenum chamber base. I know some sort of sealant is in order, just standard RTV sealant okay?
Any tips or gotchas to be aware of?
Intake manifold fitting
Moderator: phpBB2 - Administrators
-
adamnreeves
- Forum Contributor

- Posts: 594
- Joined: Sat Nov 18, 2006 6:10 pm
- Location: Bicester, Oxfordshire
- Contact:
Re: Intake manifold fitting
Two things that I can think off (Well if your talking about an RV8 anyway)adamnreeves wrote:Very soon I will be fitting the intake manifold and plenum chamber base. I know some sort of sealant is in order, just standard RTV sealant okay?
Any tips or gotchas to be aware of?
1. If you are using a tin valley gasket I'd put a very thin smear of silicone sealent round all the port holes in the gasket (and water holes) on BOTH sides of the gasket. Leave it to cure for an hour before fitting the gasket and try not to move or adjust the gasket once it has contacted the heads.
If you are using a composite gasket then I'm not sure if the silicone will stick to it but you could try. (Some people reckon that silicone is not fuel proof but it's always been OK for me. I prefer something that actually sets rather something that can always be smudged no matter how long it has been left to cure).
2. Do not tighten the manifold bolts to the 30ftlbs that is recommended on some websites. I tried this and pulled out a thread. Infact 25 is pushing it, I'd go for just 20.
AJMHO.
Pete
-
adamnreeves
- Forum Contributor
- Posts: 594
- Joined: Sat Nov 18, 2006 6:10 pm
- Location: Bicester, Oxfordshire
- Contact:
Re: Intake manifold fitting
3/8" I thought was around 18ft/lbs anyway. Its the latest 4.6 RV8. Using composite gasket.
sidecar wrote:Two things that I can think off (Well if your talking about an RV8 anyway)adamnreeves wrote:Very soon I will be fitting the intake manifold and plenum chamber base. I know some sort of sealant is in order, just standard RTV sealant okay?
Any tips or gotchas to be aware of?
1. If you are using a tin valley gasket I'd put a very thin smear of silicone sealent round all the port holes in the gasket (and water holes) on BOTH sides of the gasket. Leave it to cure for an hour before fitting the gasket and try not to move or adjust the gasket once it has contacted the heads.
If you are using a composite gasket then I'm not sure if the silicone will stick to it but you could try. (Some people reckon that silicone is not fuel proof but it's always been OK for me. I prefer something that actually sets rather something that can always be smudged no matter how long it has been left to cure).
2. Do not tighten the manifold bolts to the 30ftlbs that is recommended on some websites. I tried this and pulled out a thread. Infact 25 is pushing it, I'd go for just 20.
AJMHO.
Pete

Use the LR comp gasket and not the pattern one. The LR one is a kinda rubber coated gasket and seals very well without sealant, its also a smidgen thinner if you have skimmed your heads. The pattern one like the felpro gaskets are like a hard black shiny stuff. They still work but no where near as good IMHO.

Re: Intake manifold fitting
It was this site "wot done me in" with duff info:-
http://www.mez.co.uk/TuningTheRoverV8-pt11.html
I recon the 18-20 would be just fine!
http://www.mez.co.uk/TuningTheRoverV8-pt11.html
I recon the 18-20 would be just fine!
-
russell_ram

- Getting There

- Posts: 238
- Joined: Mon Nov 20, 2006 1:03 pm
- Location: Midlands
-
russell_ram
- Getting There
- Posts: 238
- Joined: Mon Nov 20, 2006 1:03 pm
- Location: Midlands
1. Clean sealant from cylinder head and from notches in the cylinder block.
2. Clean mating faces of cylinder block, cylinder head and manifold.
3. Ensure bolt holes are clean and dry.
4. Apply sealant, Part No. STC 50550 to notches in cylinder block.
5. Fit new gasket end seals, ensuring the ends engage correctly in notches.
6. Apply sealant, Part No. STC 50550 to gasket seals above the notches in the cylinder block.
7. Fit new manifold gasket, dry.
8. Position gasket clamps, fit and lightly tighten bolts.
9. Position inlet manifold assembly to cylinder head.
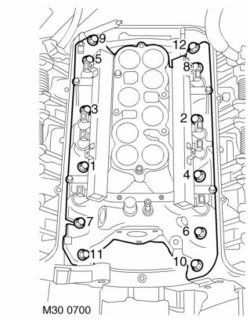
10. Fit manifold bolts and, working in the sequence illustrated, tighten as follows:
- Initially, tighten bolts numbered 1, 4, 9 and 12 in numerical order to 5 Nm (4 lbf.ft).
- Inlet manifold bolts - initial tighten = 10 Nm (8 lbf.ft).
- Inlet manifold bolts - final tighten = 51 Nm (38 lbf.ft).
- Tighten inlet manifold gasket clamp bolts to 18 Nm (14 lbf.ft).
- Tighten inlet manifold bolts to 51 Nm (38 lbf.ft)
Russ
Last edited by russell_ram on Tue Jan 22, 2008 6:32 pm, edited 1 time in total.
Rover Powered to 11.63sec @ 128mph.
Re: Intake manifold fitting
Oi ! That's my site!sidecar wrote:It was this site "wot done me in" with duff info:-
http://www.mez.co.uk/TuningTheRoverV8-pt11.html
I recon the 18-20 would be just fine!
But not my info - I'm happy to correct or remove it though.
Although just noticed the post above says 38ft-lb..
-
adamnreeves
- Forum Contributor
- Posts: 594
- Joined: Sat Nov 18, 2006 6:10 pm
- Location: Bicester, Oxfordshire
- Contact:
Re: Intake manifold fitting
Just checked my toque guide and 18ft/lbs is for 5/16. 3/8" are 30ft/lbs generally.
Eliot wrote:Oi ! That's my site!sidecar wrote:It was this site "wot done me in" with duff info:-
http://www.mez.co.uk/TuningTheRoverV8-pt11.html
I recon the 18-20 would be just fine!
But not my info - I'm happy to correct or remove it though.
Although just noticed the post above says 38ft-lb..
-
adamnreeves
- Forum Contributor
- Posts: 594
- Joined: Sat Nov 18, 2006 6:10 pm
- Location: Bicester, Oxfordshire
- Contact:
Re: Intake manifold fitting
I know its your site and its a very good site!!Eliot wrote:Oi ! That's my site!sidecar wrote:It was this site "wot done me in" with duff info:-
http://www.mez.co.uk/TuningTheRoverV8-pt11.html
I recon the 18-20 would be just fine!
But not my info - I'm happy to correct or remove it though.
Although just noticed the post above says 38ft-lb..
I also just noticed the 38ftlbs that Russ has posted.
In my humble opinion there is no way that the ali thread will take that sort of torque, as there is only about 1" of 3/8 unc thread.
I did put a post up on the Cobra forum and Jim of JRV8 reckoned that 20-25 was the correct setting. Since I had already pulled one thread out I went for 20 and from experience with nuts and bolts in general it felt like more than enough torque.
As to whether you ammend the figures on your site, that's up to you but I will say that the thread that pulled in my head "was" in good nick and my torque wrench is of reasonable quality. (What figure would you put on the site?)
Adam....On your "head" be it if you go for 38ftlbs
Regards,
Pete
-
russell_ram
- Getting There
- Posts: 238
- Joined: Mon Nov 20, 2006 1:03 pm
- Location: Midlands
russell_ram wrote:Well, that is the torque that every engine that ever went done the LR build line was built to - straight from the LR manual. I have personaly used that process many (dozens) of times with no issue also?
Russ
Russ,
There's no way that I'm knocking you knowledge of all things V8!
Maybe my thread was duff but it felt fine as I wound in the bolt, just one of those things I guess!
Pete
-
russell_ram
- Getting There
- Posts: 238
- Joined: Mon Nov 20, 2006 1:03 pm
- Location: Midlands
Not suggesting you were (and I don't claim to know it all either!). There must have been something amiss with your install. Long-ish shot, but you weren't trying to torque up a short bolt in one of the holes/positions that should have had a long one in it I suppose?
Rover Powered to 11.63sec @ 128mph.
Hi Russ,russell_ram wrote:Long-ish shot but you weren't trying to torque up a short bolt in one of the holes/positions that should have had a long one in it I suppose?
I did have the right length bolts in the right holes but thanks for your concern. (Infact it was a short one that pulled out).
As pulling a thread is such a pain in the ar5e and I was paranoid about busting any more I actually bought a load of set screws that were too long. I then cut each one down so that it was about 2mm off bottoming out as it torqued up. Each screw ended up being about 10mm longer than the originals. (I did clean the ends up carefully so that the new screws didn't "do" any more threads in!)
Oh well, just one of those things I guess!
Pete